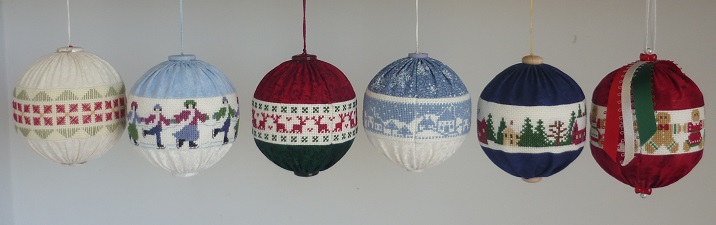
Feb 6 2016. For many years I have been thinking about making ball ornaments similar to the floss wrapped, banded ornaments I had seen at
http://www.en.coricamo.com/set,94034,christmas-balls.htm
except that I envisioned adding a stitched band to a fiberfill stuffed fabric ball that was assembled, like a beach ball, from lens shaped pieces. I knew that it would be easy to find, or design, something with a repeating motif that would wrap around a ball but for my Christmas gift ornaments I wanted to stitch a scene, like a winter landscape or Santa's workshop. I started searching but I never did find a Christmas or winter scene that had the necessary short and wide proportions.
Recently it occurred to me that if I put together fragments from Victoria Samplers' "Mystic Christmas Sampler" I could probably stitch a band that is about one inch tall and wide enough to wrap around an ornament sized ball. I made a start on it and as I was stitching the band I pondered what would be the easiest way to sew it to all of the fiddly little triangular pieces of fabric. Then I wondered if I could instead stitch it to fabric strips and assemble it like my smocked ball ornaments.
Would the edges of the flat fabric band mold well enough to the curve of the ball? Or would I have to trim off a flat area around the equator of the ball ... or cut the ball in half and add three or four circles of foamcore to the equator?
So I decided to do some experiments with some 2.5" balls that I had on hand. If you wish to read about the experiments you can keep reading. If you would like to see the Equator Band Ornament tutorial I eventually wrote you can click on the following link.
Equator Band Ornament tutorial
Experiment #1 - Quick Poinsettia Ornament
For my first experiment I quickly stitched a straight stich design ...

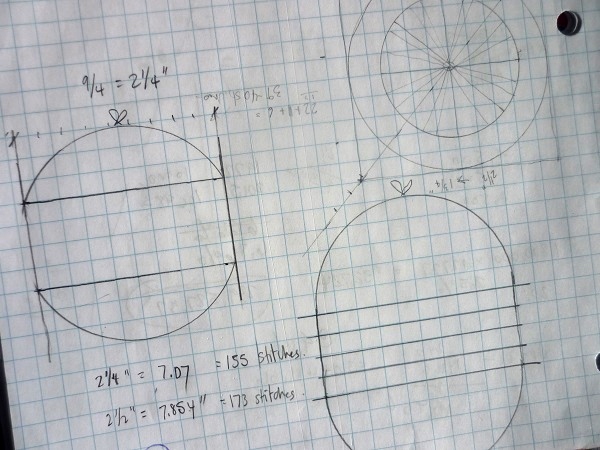
... on a scrap of 22 count hardanger. The design was the same height (24 stitches) as the Victoria Sampler scene I had stitched but I soon realized that in my haste I had grabbed a scrap that wasn't wide enough. I had planned to stitch the equivalent of 173 stitches wide but to accommodate even the minimum possible seam I had to add half of one motif to the left side and settle for 168. (Which serendipitously worked out stitching the full design 14 times.)
After I finished stitching the band I:
made three rows of gathering stitches (on the wrong side) at the top and bottom of some complimentary fabric;

cut the strip in half lengthwise;
sewed the two pieces to the stitched band;
pressed open and trimmed the seams
and sewed the two short edges together to make the tube.
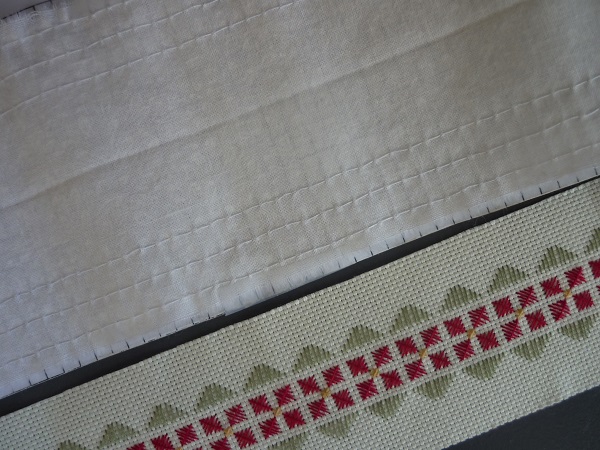
(This photo is the best representation of the complimentary fabric ...and it shows how lucky I was with the design repeat!)

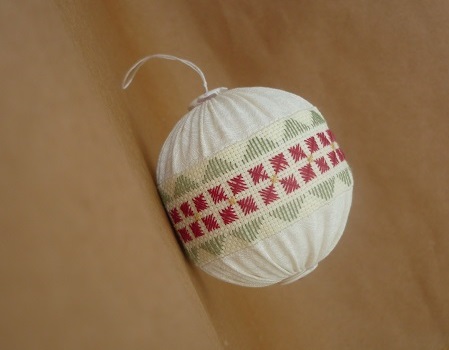
Before I inserted my ball into the tube I compressed its equator a little (to compensate for the slightly smaller than planned circumference). After I inserted the ball, drew together the gathering threads and capped the ends with some buttons this is what the finished ornament looked like.


The verdict was that this size ball, compressed a little at the equator, could accommodate a one inch, or narrower band without more radical alteration. (However, I might consider interfacing the back of the stitched band to make it a little stiffer.) But I still didn't know if it would work on an uncompressed ball. So on to ...
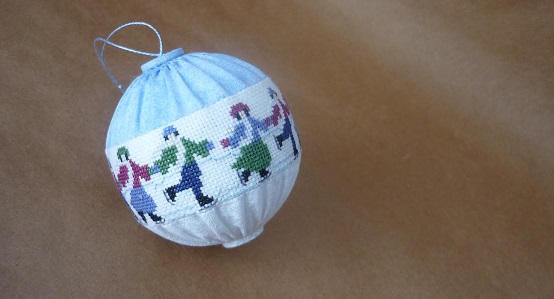
Experiment #2- Skating Party Ornament
For awhile I had considered that a Joan Elliot Victorian skating pattern from World of Cross Stitching #158 might be suitable for this type of ornament. It doesn't have the kind of detail I want for my gift ornaments but I knew I could at least rejig the pattern to fit the dimensions needed.
When I increased the number of skaters from 4 to 10 I had a design that was 169 stitches so I added 3 two stitch gaps to make 175 stitches. After a bit of stitching I also decided to change the colour of the scarves to soften the look a little.

I considering using a softer amber colour

but in the end, thinking that I was stitching on antique white fabric, I decided to use B5200. I was about half way done when I realized that the fabric was white. As illustrated in photos below the scarves blend into the background more than I would have liked but I still still prefer them to the original colour. (I suspect that the B5200 might have worked better if the faces were a little darker.)
I used two different fabrics this time. The bottom one is white on white, like snowy ice, and the top one is mottled blue, like a winter sky. The ends are capped with buttons covered with the same fabric.

This time the seam placement was more carefully planned

but luck still played a role because when I noticed that the number of pleats was divisible by 4 I knew I could add a little bit of smocking near the top and bottom of the ornament.


When I was stitching this design I suspected that it would require a larger ball but I'm happy with how it looks on the 2 1/2 inch ball.


The blue fabric has a lot of sizing and therefore it was a little resistant to pleating. (Next time I choose fabric that seems a bit stiff I should wash it first.)
And now that I'm looking at the photos of this ornament it occurs to me that it reminds me of some painted Christmas ornaments my mother acquired in the 1960s. They were yellow and magenta and pale turquoise and they had a band of Flamenco Dancers dancing around the equator. They weren't overtly Christmasy but I thought they were exotically beautiful. When we moved in 1970 they were left behind.
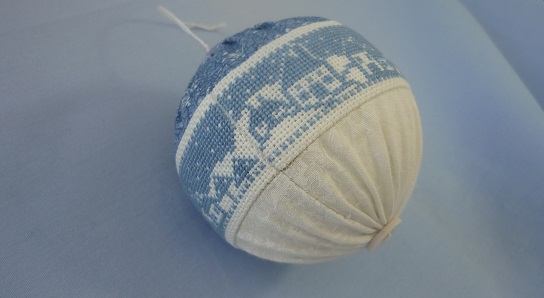
Experiment #3 - Christmas Sweater Ornament
Before I return to figuring out how I'll complete the Mystic Christmas landscape/ seascape I decided to make another repeating motif ornament. This time I stitched a shorter band on 25 count fabric and this time, instead of digging in my fabric stash to find a fabric that compliments the floss, I decided to pick floss that compliments fabric I have in my stash.
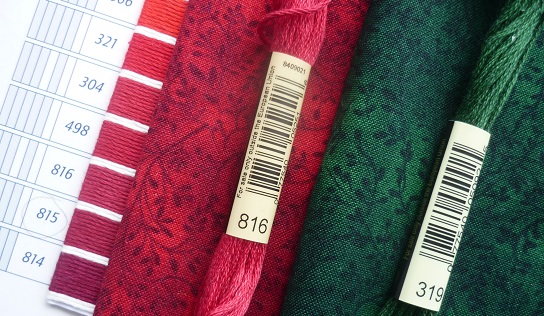
For the red I picked #816 and when I couldn't find that colour in my stash I checked my dear departed sister's stash. Luckily she had an almost full skein with a cut piece wrapped around it.
I started stitching but shortly after I started the second thread I noticed that it wasn't the same colour as the first. That is when I knew that my sister had accidentally included a single short strand of a different red in with the #816. Thinking about my sister's hands wrapping the thread around the skein made me smile. And I decided that I'm not frogging the two toned reindeer. (The pattern is an adaption of one I found at Josie Makes .)
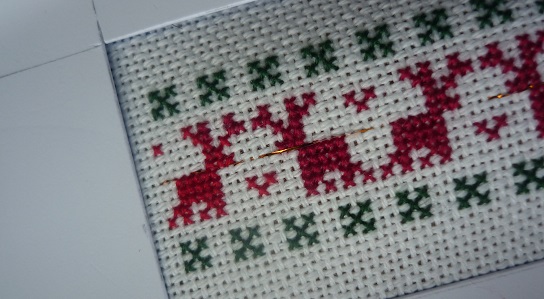
Here is the stitch band sewed to the fabric strips. I was surprised when I discovered that the pattern repeat for this simple band was 24 stitches. Since I was aiming for 8 inches, or 200 stitches, I stitched it 8 times for a total of 192 stitches.

When it came time to fit the fabric tube onto the 2 1/2 inch ball I again had to compress the equator a little and I wondered if perhaps I should have taken the time to adjust the pattern to a 25 stitch repeat. But again I managed to make it work. I also managed to find 2 similar buttons in suitable colours to cap the ends.


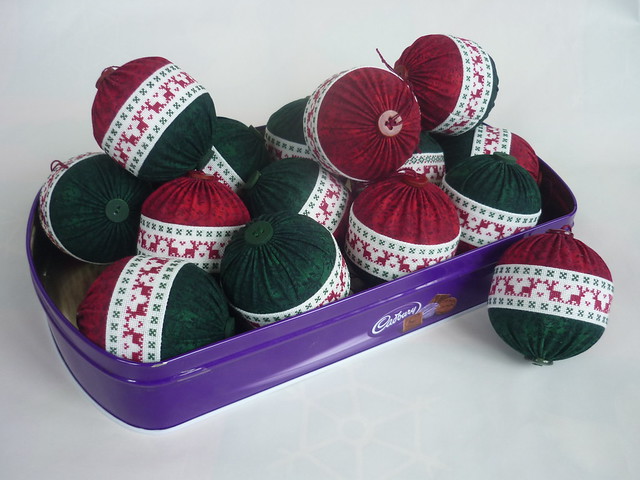
And here is how the two toned reindeer fits in with his peers.

P.S. In 2016 I used this combination as my Christmas Gift Ornament.
Experiment #4 - Winter Landscape Ornament
The design for this one is an adaptation of a Joan Elliot chart that was in a booklet included with issue 195 of Cross Stitch Crazy magazine. The design was 80 stitches wide but I repeated some sections to make it 200 stitches wide. I again sandwiched the stitched band between fabrics that suggested snow and sky .

and I capped the ends with buttons. (Though I think the perfect caps for these ones would be a couple of tiny tatted snowflakes.)

I am again satisfied with the how the seam turned out.
The experimental aspect to this one was that I did the gathering a little differently. On each end instead of using 3 rows of the type of gathering that I use for smocked ornaments (tiny stitch showing on the right side and long stitch showing on the wrong side) I did two rows of approx. 1/8" long running stitches.

What I learned is that with the longer stitches I could get nice pleats even if I just gathered up the row of stitches closest to the edge. The second row does help provide a more pronounced spoke effect but it also shows up between the pleats. I think that I will probably mist the ornament with a little bit of spray starch and when it is dry I'll remove the second row of gathering threads.
P.S. In 2018 I used this combination as my Christmas Gift Ornament.


Experiment #5 - Prairie Schooler "Christmas Eve Ornament"

On February 21 2016 I assembled another stitched band ornament. The pattern I used for this ornament tutorial was an adaption of Prairie Schooler #158 "Christmas Eve". I took many photos of the process and I have used them to create a tutorial which can be seen at
Equator Band Ornament Tutorial
Experiment #5 - "Come as you are Cookie Party" Ornament
March 1 2015. I really had a lot of fun stitching this ornament. I started with a Gingerbread Man designed by Anastasia Pollack/ Lois Winston, removed his hat (so that he would only be 21 stitches tall) and then added 8 well attired friends. The original design is 19 stitches wide so adding one stitch in between them made a stitched area of 179 stitches.

At first I thought that I would have trouble coming up with 8 variations but long before I was finished I wished that I had used 25 count fabric, instead of the 22 count hardanger, so that I could add another friend. After all I didn't have one in a skirt, or pants with suspenders, or a Christmas sweater, or a hoodie, or a bikini ... When I pondered why the characters were so differently attired I decided that the 9 Cookies must be at a "Come as you are Party". (I don't know why they would be doing jumping jacks at a Cookie Come as you are Party, but it might have something to do with the fact that the first guy seems to be wearing sweatbands.)
I pulled out my DMC sample book to choose the colours for this project and when I jotted them down on my chart I was very surprised that most were the same as on the original chart. The only colour changes I made were:
The skin tone (cookie tone?) is 422;
the reds are all 304:
the eyes are 801;
and the cheeks are 962.
I also eliminated the backstitching and I cinched the waists of the dresses from 9 stitches wide to 7 stitches wide.
When I was stitching this ornament I thought I had some 422ish fabric in my stash but the closest I could find was a bit drab.

I also considered using the ivory coloured fabric I had used in Experiment #1,

and a bold print that had a similar colour palette,

before I settled on this red on red checker board print.

At 179 stitches the stitched band was a little wider than all of the previous ones but that wasn't a problem because I had run out of 2 1/2 inch balls. It was also a little too narrow for a very dense (uncompressible) 3 inch ball I had on hand but I was able to trim the ball around the equator enough so that I could slip it in the fabric tube.
And since I hadn't had the room to add hats or hair bows to the gingerbread people I added some ribbon to the top of the finished ornament.

I used pearl top pins and red tri-beads to cap the top and bottom of this ornament. When I discovered that I couldn't get a good close up photo of the tri-beads on the ornament I sprinkled a few on my worktop.

If I stitch this design again I will probably stitch 10 cookies on 25 count and to make the cookies pop out of the background a little better I will experiment with either using 3828, instead of 422, or using some sewing thread to backstitch the perimeter of each cookie.

And then there were six!

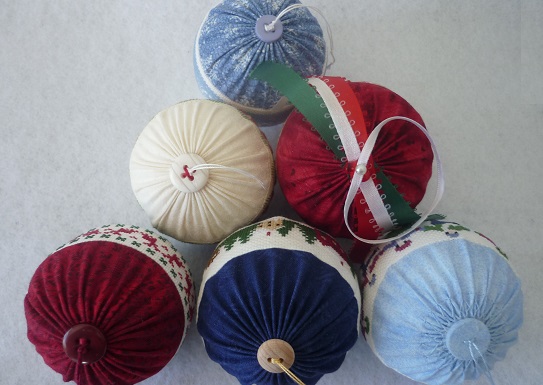
March 6 2016
Anastasia Pollack/ Lois Winston has generously granted me permission to share the chart I used to stitch my cookie characters. You should be able to see, download or print it by clicking on the image below.
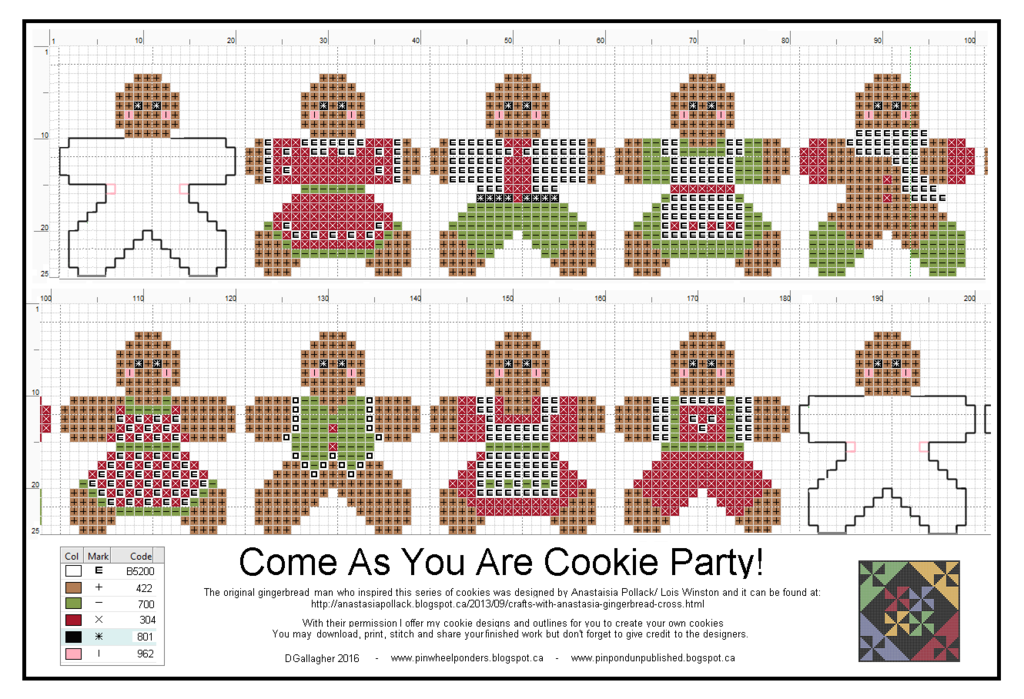
Gingerbread Cookie Party
So much MOVEMENT in the dancing skaters.
ReplyDeleteI didn't read everything. Did you say if those are buttons or covered... cardboard? Covered pennies? :D
Such wonderful creations. Reminds me of some bookmarks I did for Mom. There are probably tons of designs out there under "ribband," but you seem to have tons of inspiration. Thank you for sharing these.
The skaters really move when I set the ball to spinning. They are pretty good at crack the whip when they are spinning frontwards but it is chaos when they are spinning backwards. :*)
ReplyDeleteI have added a photo and some words to indicate how I capped the ends. The buttons and covered buttons are simpler than what I have previously used to cap the ends of smocked ornaments. I have been thinking that Dorset buttons (like those at http://www.manfredhorvath.at/fotos/xb0105156/) might make nice end caps and somewhere I have some plastic rings that should be just the right size.
I remember those bookmarks and those are the type of long scenic patterns I have been seeking. They aren't easy to find.
Crack the whip at the roller skating rink! A resurrected memory. Thank you for taking the time to explain, Pinwheel. You are such a love.
ReplyDeleteSplendid idea, the alternative method with gathers. The blue village -- with white snow on the bottom and blue sky above, ala the skaters -- is beautiful, more than beautiful. The "match up" works well in all of them and I'd be happy with the blue village, too. Rock on, Pinwheel. These are superb. Send DH or one or more of the twigs to look for a branch. A perfect branch upon which to showcase these ornaments. (The family that creates together is... wonderful.) :)
ReplyDeleteIs the Bluenose II the one Lovely Lee stitched... as the blue dime? Nevermind, I'll Google. Liking your description of the other changes you have in mind. Loving the sails on the ship just off shore so hoping the Bluenose has sails... though if it's like the dime chart, it does.
ReplyDeleteThere was a time I might have been able to pick a favorite. That time is long gone. Good work, Mz Pinwheel. Well done.
Well, there you go. "My Favorite" is going to be your latest. Loving the gingerbread cookies ornament. Makes me smile, and makes me drool. :)
ReplyDeleteOh dear. That's me, Dee in Tee, as unknown. Sorry I've lost the plot on how to post as "me."
ReplyDeleteAnd regained it. (Oh bother.)
DeleteNo problem Dee. I recently did the same thing but in my case blogger thought I was a friend who had borrowed my computer to check their email and not logged out afterwards. I didn't notice that I wasn't I until after the comment was published.
ReplyDelete:) A glitch.
DeleteThank you for making the gingerbread charts available at 1-2-3. Well done, Professor.